Gumawa at mag-transpile laban sa mga custom na backend
# Added by doQumentation — required packages for this notebook
!pip install -q numpy qiskit rustworkx
# Don't use SVGs for this file because the images are too large,
# and the SVGs are much larger than their PNGs equivalents.
%config InlineBackend.figure_format='png'
```json

{/* cspell:ignore multichip interchip Lasciate ogne speranza voi ch'intrate */}
{/*
  DO NOT EDIT THIS CELL!!!
  This cell's content is generated automatically by a script. Anything you add
  here will be removed next time the notebook is run. To add new content, create
  a new cell before or after this one.
*/}

<details>
<summary><b>Mga bersyon ng package</b></summary>

Ang code sa pahinang ito ay na-develop gamit ang mga sumusunod na kinakailangan.
Inirerekomenda naming gamitin ang mga bersyong ito o mas bago.
qiskit[all]~=2.4.0
</details>
{/* cspell:ignore LOCC */}

Isa sa mga pinaka-kapaki-pakinabang na feature ng Qiskit ay ang kakayahang suportahan ang mga natatanging configuration ng device. Ang Qiskit ay dinisenyo upang maging agnostic sa provider ng quantum hardware na ginagamit mo, at maaaring i-configure ng mga provider ang object na `BackendV2` ayon sa kanilang sariling natatanging katangian ng device. Ipinapakita ng topic na ito kung paano i-configure ang sarili mong backend at mag-transpile ng mga quantum circuit laban sa mga ito.

Maaari kang gumawa ng mga natatanging object na `BackendV2` na may iba't ibang geometry o basis gate at i-transpile ang iyong mga circuit na isinasaalang-alang ang mga configuration na iyon. Saklaw ng halimbawa sa ibaba ang isang backend na may disjoint qubit lattice, na ang mga basis gate ay naiiba sa mga gilid kumpara sa loob ng bulk.

## Unawain ang mga interface ng Provider, BackendV2, at Target \{#understand-the-provider-backendv2-and-target-interfaces}

Bago magsimula, kapaki-pakinabang na maunawaan ang paggamit at layunin ng mga object na [`Provider`](../api/qiskit/providers), [`BackendV2`](../api/qiskit/qiskit.providers.BackendV2), at [`Target`](../api/qiskit/qiskit.transpiler.Target).

- Kung mayroon kang quantum device o simulator na gusto mong isama sa Qiskit SDK, kailangan mong isulat ang sarili mong klase na `Provider`. Ang klase na ito ay may iisang layunin: para makuha ang mga backend object na ibinibigay mo. Dito pinamamahalaan ang anumang kinakailangang gawain sa kredensyal at/o authentication. Kapag na-instantiate na, ang provider object ay magbibigay ng listahan ng mga backend pati na rin ang kakayahang makuha/ma-instantiate ang mga backend.

- Susunod, ang mga backend class ay nagbibigay ng interface sa pagitan ng Qiskit SDK at ng hardware o simulator na magsasagawa ng mga circuit. Kasama dito ang lahat ng kinakailangang impormasyon upang ilarawan ang isang backend sa transpiler upang ma-optimize nito ang anumang circuit ayon sa mga limitasyon nito. Ang isang `BackendV2` ay binubuo ng apat na pangunahing bahagi:
  - Isang property na [`Target`](../api/qiskit/qiskit.transpiler.Target), na naglalaman ng paglalarawan ng mga limitasyon ng backend at nagbibigay ng modelo ng backend para sa transpiler
  - Isang property na `max_circuits` na nagtatakda ng limitasyon sa bilang ng mga circuit na maaaring isagawa ng isang backend sa isang trabaho
  - Isang method na `run()` na tumatanggap ng mga job submission
  - Isang set ng `_default_options` upang tukuyin ang mga opsyon na maaaring i-configure ng user at ang kanilang mga default na halaga

## Gumawa ng custom na BackendV2 \{#create-a-custom-backendv2}

Ang object na `BackendV2` ay isang abstract na klase na ginagamit para sa lahat ng backend object na nilikha ng isang provider (alinman sa loob ng `qiskit.providers` o isa pang library tulad ng [`qiskit_ibm_runtime.IBMBackend`](../api/qiskit-ibm-runtime/ibm-backend)). Gaya ng nabanggit sa itaas, ang mga object na ito ay naglalaman ng ilang attribute, kabilang ang isang [`Target`](https://docs.quantum.ibm.com/api/qiskit/qiskit.transpiler.Target). Ang `Target` ay naglalaman ng impormasyon na tumutukoy sa mga katangian ng backend — tulad ng [`Coupling Map`](https://docs.quantum.ibm.com/api/qiskit/qiskit.transpiler.CouplingMap), listahan ng mga [`Instructions`](https://docs.quantum.ibm.com/api/qiskit/qiskit.circuit.Instruction), at iba pa — para sa transpiler. Bukod sa `Target`, maaari rin itong tukuyin ang mga detalye sa antas ng pulse tulad ng [`DriveChannel`](https://docs.quantum.ibm.com/api/qiskit/1.4/qiskit.pulse.channels.DriveChannel) o [`ControlChannel`](https://docs.quantum.ibm.com/api/qiskit/1.4/qiskit.pulse.channels.ControlChannel).

Ipinapakita ng sumusunod na halimbawa ang customization na ito sa pamamagitan ng paglikha ng isang simulate na multi-chip backend, kung saan ang bawat chip ay may heavy-hex connectivity. Tinukoy ng halimbawa ang two-qubit gate set ng backend bilang [`CZGates`](../api/qiskit/qiskit.circuit.library.CZGate) sa loob ng bawat chip at [`CXGates`](../api/qiskit/qiskit.circuit.library.ECRGate) sa pagitan ng mga chip. Una, gumawa ng sariling `BackendV2` at i-customize ang `Target` nito gamit ang mga single at two-qubit gate ayon sa mga limitasyong inilarawan kanina.

<Admonition type="tip" title="graphviz library">
Ang pag-plot ng coupling map ay nangangailangan ng library na [`graphviz`](https://graphviz.org/) na mai-install.
</Admonition>

```python
import numpy as np
import rustworkx as rx

from qiskit.providers import BackendV2, Options
from qiskit.transpiler import Target, InstructionProperties
from qiskit.circuit.library import XGate, SXGate, RZGate, CZGate, ECRGate
from qiskit.circuit import Measure, Delay, Parameter, Reset
from qiskit import QuantumCircuit, transpile
from qiskit.visualization import plot_gate_map

class FakeLOCCBackend(BackendV2):
    """Fake multi chip backend."""

    def __init__(self, distance=3, number_of_chips=3):
        """Instantiate a new fake multi chip backend.

        Args:
            distance (int): The heavy hex code distance to use for each chips'
                coupling map. This number **must** be odd. The distance relates
                to the number of qubits by:
                :math:`n = \\frac{5d^2 - 2d - 1}{2}` where :math:`n` is the
                number of qubits and :math:`d` is the ``distance``
            number_of_chips (int): The number of chips to have in the multichip backend
                each chip will be a heavy hex graph of ``distance`` code distance.
        """
        super().__init__(name="Fake LOCC backend")
        # Create a heavy-hex graph using the
        # rustworkx library, then instantiate a new target
        self._graph = rx.generators.directed_heavy_hex_graph(
            distance, bidirectional=False
        )
        num_qubits = len(self._graph) * number_of_chips
        self._target = Target(
            "Fake multi-chip backend", num_qubits=num_qubits
        )

        # Generate instruction properties for single qubit gates and a measurement, delay,
        #  and reset operation to every qubit in the backend.
        rng = np.random.default_rng(seed=12345678942)
        rz_props = {}
        x_props = {}
        sx_props = {}
        measure_props = {}
        delay_props = {}

        # Add 1q gates. Globally use virtual rz, x, sx, and measure
        for i in range(num_qubits):
            qarg = (i,)
            rz_props[qarg] = InstructionProperties(error=0.0, duration=0.0)
            x_props[qarg] = InstructionProperties(
                error=rng.uniform(1e-6, 1e-4),
                duration=rng.uniform(1e-8, 9e-7),
            )
            sx_props[qarg] = InstructionProperties(
                error=rng.uniform(1e-6, 1e-4),
                duration=rng.uniform(1e-8, 9e-7),
            )
            measure_props[qarg] = InstructionProperties(
                error=rng.uniform(1e-3, 1e-1),
                duration=rng.uniform(1e-8, 9e-7),
            )
            delay_props[qarg] = None
        self._target.add_instruction(XGate(), x_props)
        self._target.add_instruction(SXGate(), sx_props)
        self._target.add_instruction(RZGate(Parameter("theta")), rz_props)
        self._target.add_instruction(Measure(), measure_props)
        self._target.add_instruction(Reset(), measure_props)

        self._target.add_instruction(Delay(Parameter("t")), delay_props)
        # Add chip local 2q gate which is CZ
        cz_props = {}
        for i in range(number_of_chips):
            for root_edge in self._graph.edge_list():
                offset = i * len(self._graph)
                edge = (root_edge[0] + offset, root_edge[1] + offset)
                cz_props[edge] = InstructionProperties(
                    error=rng.uniform(7e-4, 5e-3),
                    duration=rng.uniform(1e-8, 9e-7),
                )
        self._target.add_instruction(CZGate(), cz_props)

        cx_props = {}
        # Add interchip 2q gates which are ecr (effectively CX)
        # First determine which nodes to connect
        node_indices = self._graph.node_indices()
        edge_list = self._graph.edge_list()
        inter_chip_nodes = {}
        for node in node_indices:
            count = 0
            for edge in edge_list:
                if node == edge[0]:
                    count += 1
            if count == 1:
                inter_chip_nodes[node] = count
        # Create inter-chip ecr props
        cx_props = {}
        inter_chip_edges = list(inter_chip_nodes.keys())
        for i in range(1, number_of_chips):
            offset = i * len(self._graph)
            edge = (
                inter_chip_edges[1] + (len(self._graph) * (i - 1)),
                inter_chip_edges[0] + offset,
            )
            cx_props[edge] = InstructionProperties(
                error=rng.uniform(7e-4, 5e-3),
                duration=rng.uniform(1e-8, 9e-7),
            )

        self._target.add_instruction(ECRGate(), cx_props)

    @property
    def target(self):
        return self._target

    @property
    def max_circuits(self):
        return None

    @property
    def graph(self):
        return self._graph

    @classmethod
    def _default_options(cls):
        return Options(shots=1024)

    def run(self, circuit, **kwargs):
        raise NotImplementedError(
            "This backend does not contain a run method"
        )
I-visualize ang mga backend
Maaari mong tingnan ang connectivity graph ng bagong klase na ito gamit ang method na plot_gate_map() mula sa module na qiskit.visualization. Ang method na ito, kasama ang plot_coupling_map() at plot_circuit_layout(), ay mga kapaki-pakinabang na tool para sa pag-visualize ng ayos ng qubit sa isang backend, pati na rin kung paano nakalatag ang isang circuit sa mga qubit ng isang backend. Gumagawa ang halimbawang ito ng isang backend na naglalaman ng tatlong maliliit na heavy-hex chip. Tinukoy nito ang isang set ng mga coordinate upang ayusin ang mga qubit, pati na rin isang set ng mga custom na kulay para sa iba't ibang two-qubit gate.
backend = FakeLOCCBackend(3, 3)

target = backend.target
coupling_map_backend = target.build_coupling_map()

coordinates = [
    (3, 1),
    (3, -1),
    (2, -2),
    (1, 1),
    (0, 0),
    (-1, -1),
    (-2, 2),
    (-3, 1),
    (-3, -1),
    (2, 1),
    (1, -1),
    (-1, 1),
    (-2, -1),
    (3, 0),
    (2, -1),
    (0, 1),
    (0, -1),
    (-2, 1),
    (-3, 0),
]

single_qubit_coordinates = []
total_qubit_coordinates = []

for coordinate in coordinates:
    total_qubit_coordinates.append(coordinate)

for coordinate in coordinates:
    total_qubit_coordinates.append(
        (-1 * coordinate[0] + 1, coordinate[1] + 4)
    )

for coordinate in coordinates:
    total_qubit_coordinates.append((coordinate[0], coordinate[1] + 8))

line_colors = ["#adaaab" for edge in coupling_map_backend.get_edges()]
ecr_edges = []

# Get tuples for the edges which have an ecr instruction attached
for instruction in target.instructions:
    if instruction[0].name == "ecr":
        ecr_edges.append(instruction[1])

for i, edge in enumerate(coupling_map_backend.get_edges()):
    if edge in ecr_edges:
        line_colors[i] = "#000000"
print(backend.name)
plot_gate_map(
    backend,
    plot_directed=True,
    qubit_coordinates=total_qubit_coordinates,
    line_color=line_colors,
)
Fake LOCC backend
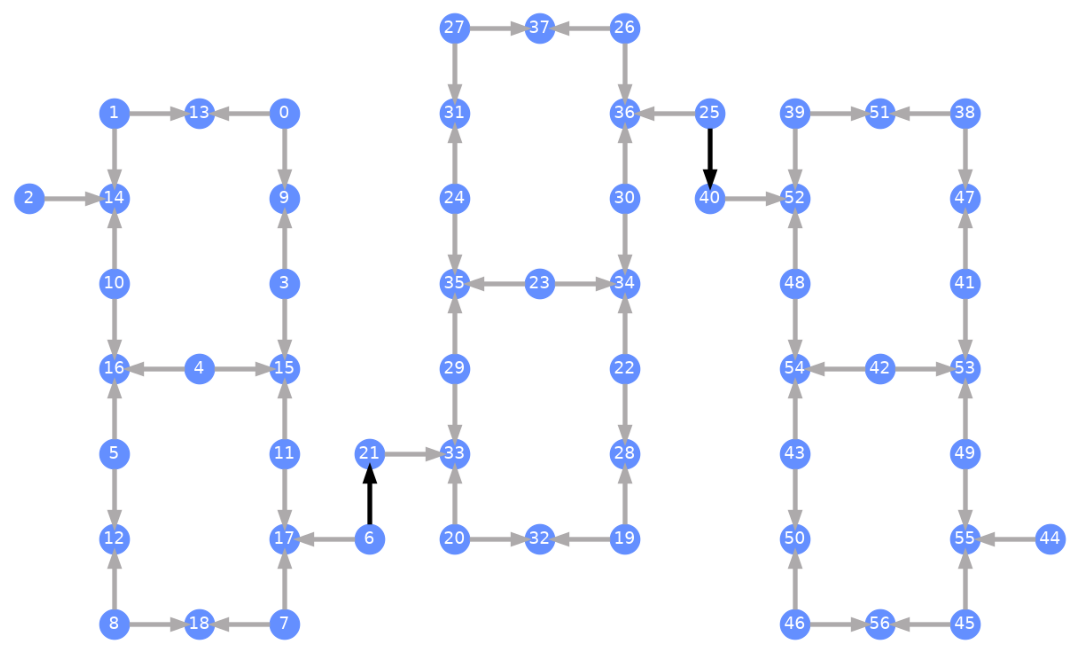
Ang bawat qubit ay may label, at ang mga may kulay na arrow ay kumakatawan sa mga two-qubit gate. Ang mga kulay-abong arrow ay ang mga CZ gate at ang mga itim na arrow ay ang mga inter-chip CX gate (ikinokonekta nito ang mga qubit na at ). Ang direksyon ng arrow ay nagpapakita ng default na direksyon kung saan isinasagawa ang mga gate na ito; tinutukoy nila kung aling mga qubit ang control/target bilang default para sa bawat two-qubit channel.
Mag-transpile laban sa mga custom na backend
Ngayong natukoy na ang isang custom na backend na may sariling natatanging Target, madali nang mag-transpile ng mga quantum circuit laban sa backend na ito, dahil ang lahat ng kaugnay na limitasyon (basis gate, qubit connectivity, at iba pa) na kailangan para sa mga transpiler pass ay nakapaloob sa attribute na ito. Ang susunod na halimbawa ay nagtatayo ng isang circuit na gumagawa ng malaking GHZ state at ini-transpile ito laban sa backend na itinayo sa itaas.
from qiskit.transpiler import generate_preset_pass_manager

num_qubits = 50
ghz = QuantumCircuit(num_qubits)
ghz.h(range(num_qubits))
ghz.cx(0, range(1, num_qubits))
op_counts = ghz.count_ops()

print("Pre-Transpilation: ")
print(f"CX gates: {op_counts['cx']}")
print(f"H gates: {op_counts['h']}")
print("\n", 30 * "#", "\n")

pm = generate_preset_pass_manager(optimization_level=3, backend=backend)
transpiled_ghz = pm.run(ghz)
op_counts = transpiled_ghz.count_ops()

print("Post-Transpilation: ")
print(f"CZ gates: {op_counts['cz']}")
print(f"ECR gates: {op_counts['ecr']}")
print(f"SX gates: {op_counts['sx']}")
print(f"RZ gates: {op_counts['rz']}")
Pre-Transpilation:
CX gates: 49
H gates: 50

 ##############################
Post-Transpilation:
CZ gates: 146
ECR gates: 6
SX gates: 302
RZ gates: 250
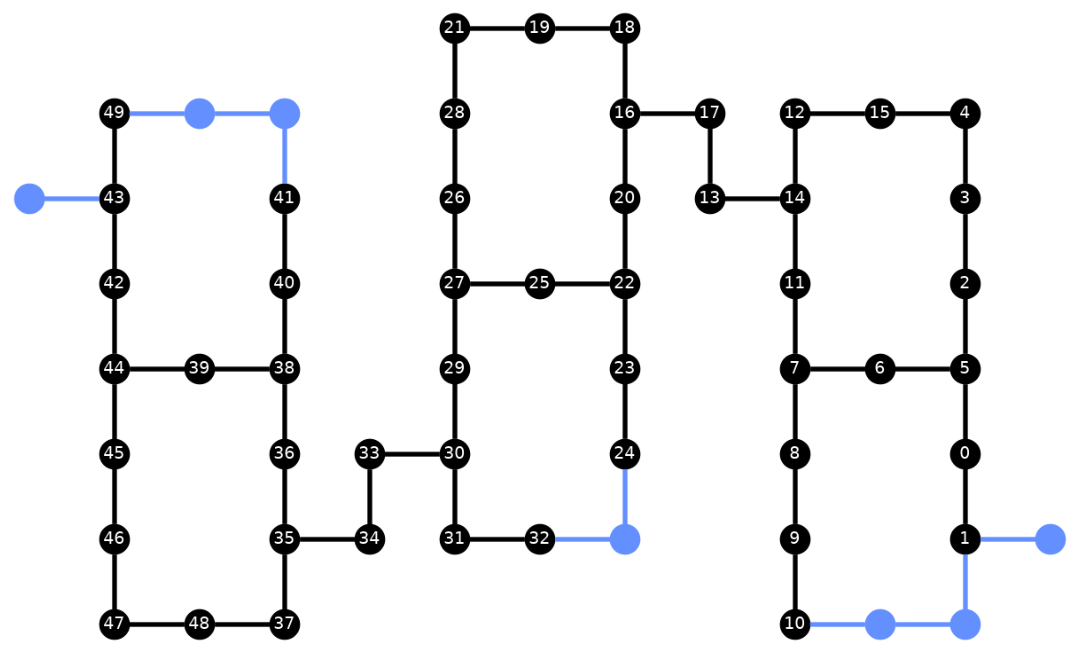
Ang transpiled na circuit ay naglalaman na ngayon ng halo ng mga gate na CZ at ECR, na tinukoy natin bilang mga basis gate sa Target ng backend. Mayroon ding mas maraming gate kaysa sa simula dahil sa pangangailangan na maglagay ng mga SWAP instruction pagkatapos pumili ng layout. Sa ibaba, ginagamit ang visualization tool na plot_circuit_layout() upang tukuyin kung aling mga qubit at two-qubit channel ang ginamit sa circuit na ito.
from qiskit.visualization import plot_circuit_layout

plot_circuit_layout(
    transpiled_ghz, backend, qubit_coordinates=total_qubit_coordinates
)
Gumawa ng mga natatanging backend
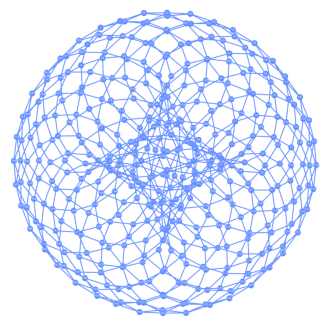
Ang package na rustworkx ay naglalaman ng malaking library ng iba't ibang graph at nagbibigay-daan sa paglikha ng mga custom na graph. Ang visually interesting na code sa ibaba ay gumagawa ng isang backend na inspirado ng toric code. Maaari mo itong i-visualize gamit ang mga function mula sa seksyon na I-visualize ang mga backend.
class FakeTorusBackend(BackendV2):
    """Fake multi chip backend."""

    def __init__(self):
        """Instantiate a new backend that is inspired by a toric code"""
        super().__init__(name="Fake LOCC backend")
        graph = rx.generators.directed_grid_graph(20, 20)
        for column in range(20):
            graph.add_edge(column, 19 * 20 + column, None)
        for row in range(20):
            graph.add_edge(row * 20, row * 20 + 19, None)
        num_qubits = len(graph)
        rng = np.random.default_rng(seed=12345678942)
        rz_props = {}
        x_props = {}
        sx_props = {}
        measure_props = {}
        delay_props = {}
        self._target = Target("Fake Kookaburra", num_qubits=num_qubits)
        # Add 1q gates. Globally use virtual rz, x, sx, and measure
        for i in range(num_qubits):
            qarg = (i,)
            rz_props[qarg] = InstructionProperties(error=0.0, duration=0.0)
            x_props[qarg] = InstructionProperties(
                error=rng.uniform(1e-6, 1e-4),
                duration=rng.uniform(1e-8, 9e-7),
            )
            sx_props[qarg] = InstructionProperties(
                error=rng.uniform(1e-6, 1e-4),
                duration=rng.uniform(1e-8, 9e-7),
            )
            measure_props[qarg] = InstructionProperties(
                error=rng.uniform(1e-3, 1e-1),
                duration=rng.uniform(1e-8, 9e-7),
            )
            delay_props[qarg] = None
        self._target.add_instruction(XGate(), x_props)
        self._target.add_instruction(SXGate(), sx_props)
        self._target.add_instruction(RZGate(Parameter("theta")), rz_props)
        self._target.add_instruction(Measure(), measure_props)
        self._target.add_instruction(Reset(), measure_props)
        self._target.add_instruction(Delay(Parameter("t")), delay_props)
        cz_props = {}
        for edge in graph.edge_list():
            cz_props[edge] = InstructionProperties(
                error=rng.uniform(7e-4, 5e-3),
                duration=rng.uniform(1e-8, 9e-7),
            )
        self._target.add_instruction(CZGate(), cz_props)

    @property
    def target(self):
        return self._target

    @property
    def max_circuits(self):
        return None

    @classmethod
    def _default_options(cls):
        return Options(shots=1024)

    def run(self, circuit, **kwargs):
        raise NotImplementedError("Lasciate ogne speranza, voi ch'intrate")
backend = FakeTorusBackend()
# We set `figsize` to a smaller size to make the documentation website faster
# to load. Normally, you do not need to set the argument.
plot_gate_map(backend, figsize=(4, 4))
num_qubits = int(backend.num_qubits / 2)
full_device_bv = QuantumCircuit(num_qubits, num_qubits - 1)
full_device_bv.x(num_qubits - 1)
full_device_bv.h(range(num_qubits))
full_device_bv.cx(range(num_qubits - 1), num_qubits - 1)
full_device_bv.h(range(num_qubits))
full_device_bv.measure(range(num_qubits - 1), range(num_qubits - 1))
tqc = transpile(full_device_bv, backend, optimization_level=3)
op_counts = tqc.count_ops()
print(f"CZ gates: {op_counts['cz']}")
print(f"X gates: {op_counts['x']}")
print(f"SX gates: {op_counts['sx']}")
print(f"RZ gates: {op_counts['rz']}")
CZ gates: 834
X gates: 18
SX gates: 1534
RZ gates: 1150