Simulate ang 2D tilted-field Ising gamit ang QESEM function
Ang Qiskit Functions ay isang eksperimentong feature na available lamang sa IBM Quantum® Premium Plan, Flex Plan, at On-Prem (via IBM Quantum Platform API) Plan users. Nasa preview release status ang mga ito at maaaring magbago.
Estimate sa paggamit: 20 minuto sa Heron r2 processor. (PAALALA: Ito ay estimate lamang. Ang iyong runtime ay maaaring mag-iba.)
Background
Ang tutorial na ito ay nagpapakita kung paano gamitin ang QESEM, ang Qiskit Function ng Qedma, upang i-simulate ang dynamics ng isang canonical quantum spin model, ang 2D tilted-field Ising (TFI) model na may non-Clifford angles:
kung saan ang ay tumutukoy sa pinakamalapit na kapitbahay sa isang lattice. Ang pag-simulate ng time evolution ng many-body quantum systems ay isang computationally hard na gawain para sa classical computers. Ang quantum computers, sa kabilang banda, ay natural na dinisenyo upang maisagawa ang gawaing ito nang mahusay. Ang TFI model, partikular na, ay naging popular na benchmark sa quantum hardware dahil sa mayamang pisikal na pag-uugali nito at hardware-friendly na pagpapatupad.
Sa halip na mag-simulate ng continuous-time dynamics, ginagamit natin ang malapit na kaugnay na kicked Ising model. Ang dynamics ay maaaring ipahayag nang eksakto bilang isang periodic quantum circuit, kung saan ang bawat evolution step ay binubuo ng tatlong layers ng fractional two-qubit gates , na pinagsasama sa mga layers ng single-qubit gates at .
Gagamitin natin ang generic angles na hamon para sa classical simulation at error mitigation. Partikular na, pumili tayo ng , , at , na naglalagay sa model na malayo sa anumang integrable point.
Sa tutorial na ito ay gagawin natin ang sumusunod:
- Tantiyahin ang inaasahang QPU runtime para sa kumpletong error mitigation gamit ang analytical at empirical time estimation features ng QESEM.
- Bumuo at i-simulate ang 2D tilted-field Ising model circuit gamit ang hardware-inspired na qubit layouts at gate layers.
- I-visualize ang device qubit connectivity at mga napiling subgraphs para sa inyong eksperimento.
- Ipakita ang paggamit ng operator backpropagation (OBP) upang bawasan ang circuit depth. Ang pamamaraan na ito ay nag-aalis ng mga operasyon mula sa circuit end sa halaga ng mas maraming operator measurements.
- Isagawa ang unbiased error mitigation (EM) para sa maraming observables nang sabay-sabay gamit ang QESEM, na inihahambing ang ideal, noisy, at mitigated na mga resulta.
- Suriin at i-plot ang epekto ng error mitigation sa magnetization sa iba't ibang circuit depths.
Paalala: Ang OBP ay karaniwang magbabalik ng isang set ng posibleng non-commuting observables. Ang QESEM ay awtomatikong nag-o-optimize ng measurement bases kapag ang target observables ay naglalaman ng non-commuting terms. Bumubuo ito ng candidate measurement basis sets gamit ang ilang heuristic algorithms at pumipili ng set na nagpapababa ng bilang ng distinct bases. Ibig sabihin, ang QESEM ay nagsasama ng compatible observables sa common bases upang bawasan ang kabuuang bilang ng measurement configurations na kailangan, na nagpapabuti ng kahusayan.
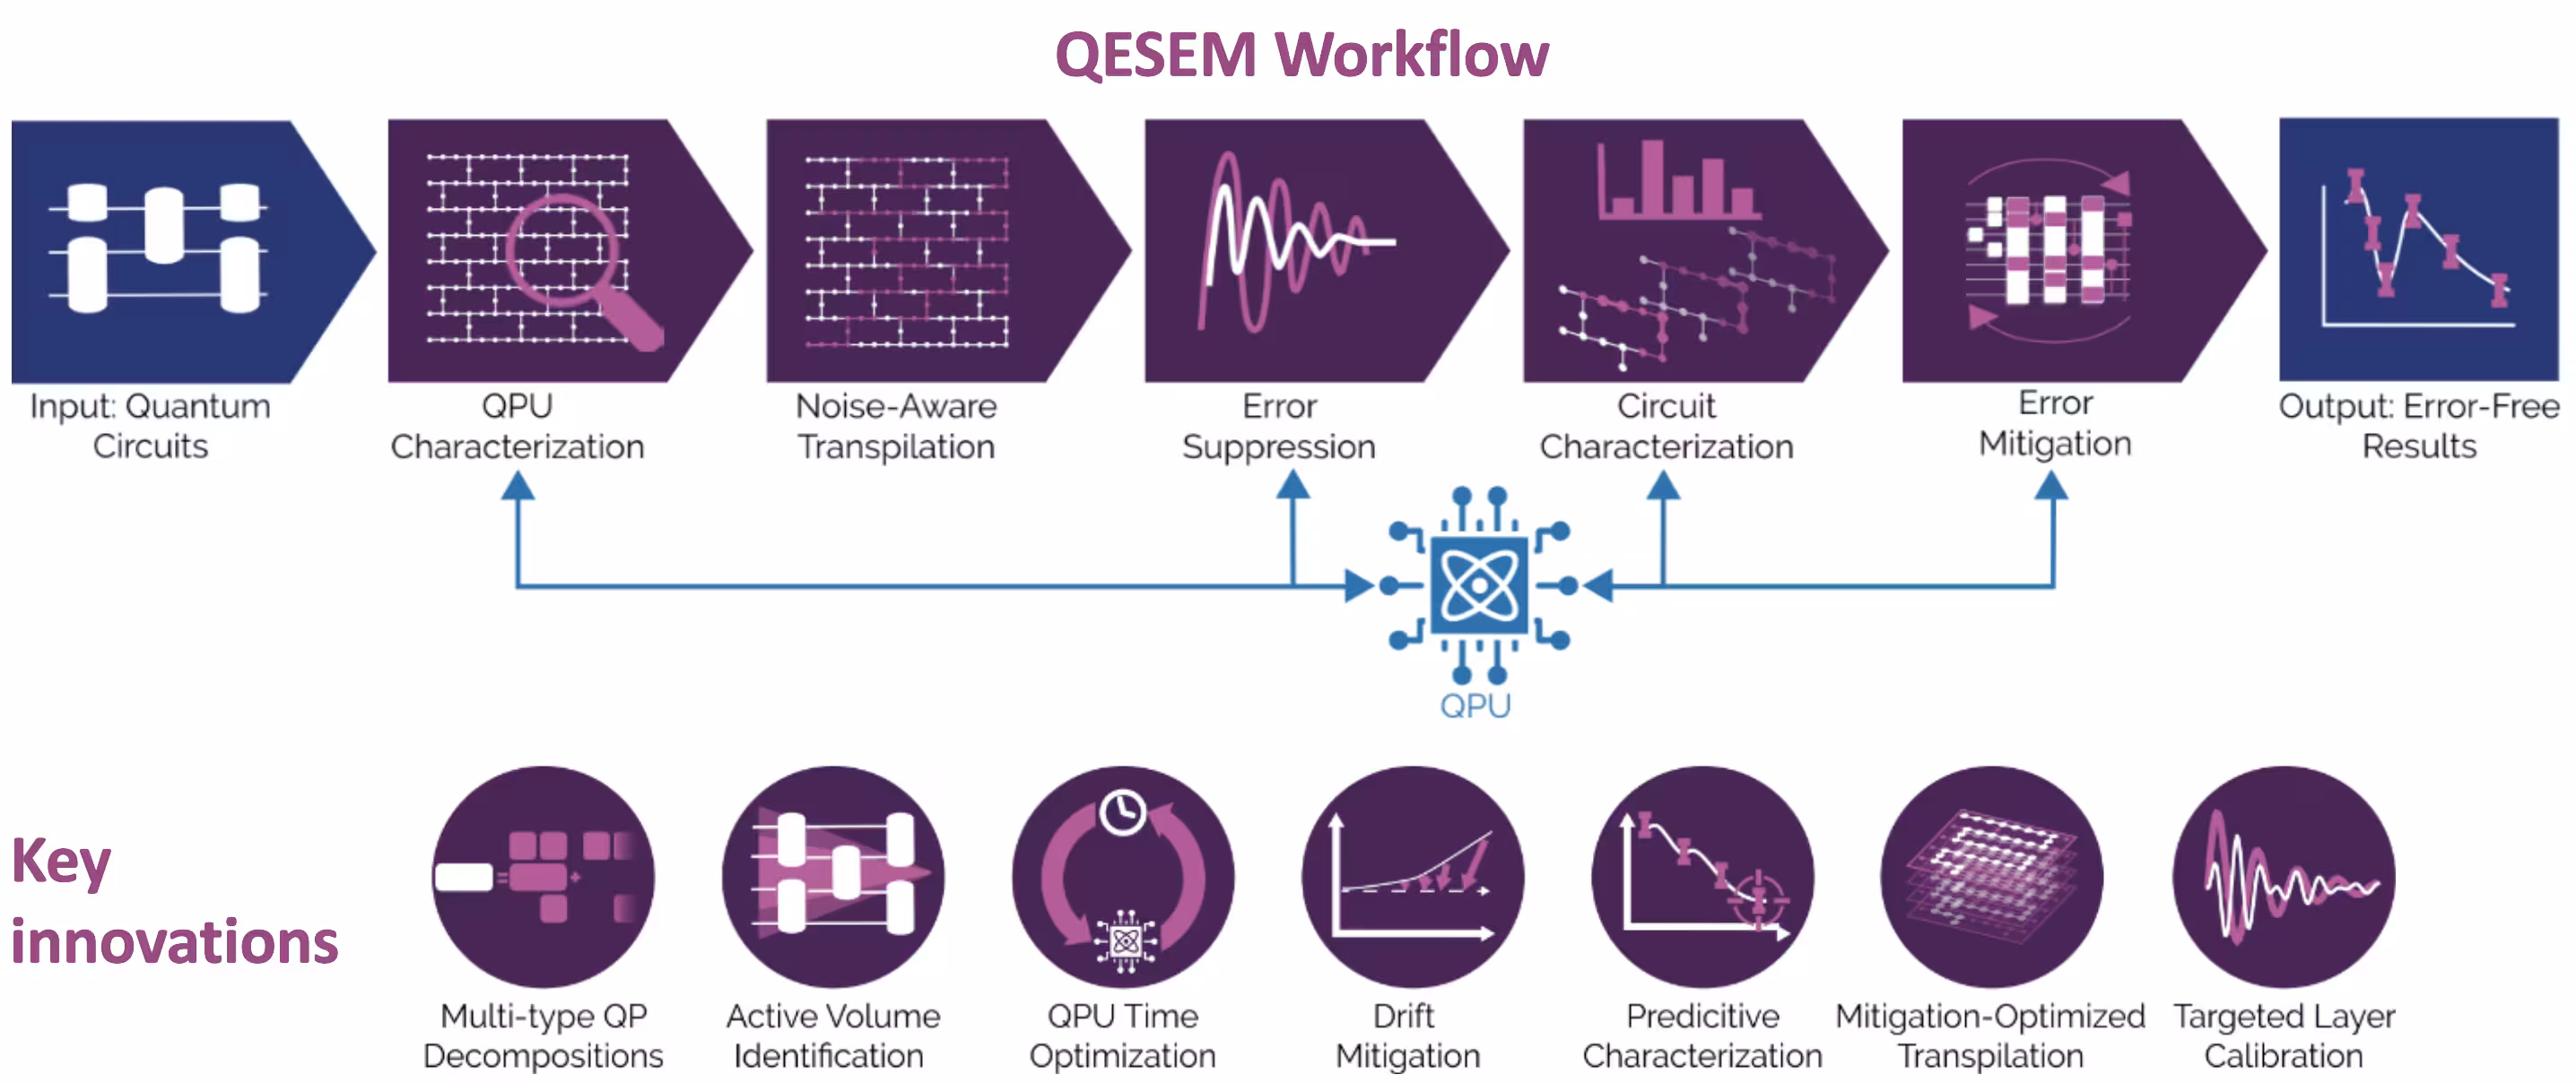
Tungkol sa QESEM
Ang QESEM ay isang maaasahan, mataas na katumpakan, characterization-based na software na nagpapatupad ng mahusay, unbiased quasi-probabilistic error mitigation. Dinisenyo ito upang bawasan ang mga error sa generic quantum circuits at ito ay application-agnostic. Napatunayan na ito sa iba't ibang hardware platforms, kabilang ang utility-scale experiments sa IBM® Eagle at Heron devices. Ang mga yugto ng QESEM workflow ay ang mga sumusunod:
- Device characterization - nagmamapa ng gate fidelities at tumutukoy ng coherent errors, na nagbibigay ng real-time calibration data. Ang yugtong ito ay nagsisiguro na ang mitigation ay gumagamit ng pinakamataas na fidelity operations na available.
- Noise-aware transpilation - bumubuo at sinusuri ang alternatibong qubit mappings, operation sets, at measurement bases, na pumipili ng variant na nagpapababa ng estimated QPU runtime, na may optional parallelization upang pabilisin ang data collection.
- Error suppression - muling tinutukoy ang native gates, nag-aaplay ng Pauli twirling, at nag-o-optimize ng pulse-level control (sa supported platforms) upang mapabuti ang fidelity.
- Circuit characterization - bumubuo ng tailored local error model at itinatapat ito sa QPU measurements upang sukatin ang residual noise.
- Error mitigation - bumubuo ng multi-type quasi-probabilistic decompositions, at kumukuha ng samples mula sa mga ito sa isang adaptive process na nagpapababa ng mitigation QPU time at sensitivity sa hardware fluctuations, na nakakamit ng mataas na accuracy sa malalaking circuit volumes.
Para sa higit pang impormasyon tungkol sa QESEM at isang utility-scale experiment ng model na ito sa 103-qubit, high-connectivity subgraph ng native heavy-hex geometry ng ibm_marrakesh, sumangguni sa Reliable high-accuracy error mitigation for utility-scale quantum circuits.
Mga Kinakailangan
I-install ang mga sumusunod na Python packages bago patakbuhin ang notebook:
- Qiskit SDK v2.0.0 o mas bago (
pip install qiskit) - Qiskit Runtime v0.40.0 o mas bago (
pip install qiskit-ibm-runtime) - Qiskit Functions Catalog v0.8.0 o mas bago (
pip install qiskit-ibm-catalog) - Operator Backpropagation Qiskit addon v0.3.0 o mas bago (
pip install qiskit-addon-obp) - Qiskit Utils addon v0.1.1 o mas bago (
pip install qiskit-addon-utils) - Qiskit Aer simulator v0.17.1 o mas bago (
pip install qiskit-aer) - Matplotlib v3.10.3 o mas bago (
pip install matplotlib)
Pag-setup
Una, i-import ang mga kaukulang libraries:
# Added by doQumentation — required packages for this notebook
!pip install -q matplotlib numpy qiskit qiskit-addon-obp qiskit-addon-utils qiskit-aer qiskit-ibm-catalog qiskit-ibm-runtime
%matplotlib inline

from typing import Sequence

import matplotlib.pyplot as plt
import numpy as np

import qiskit
from qiskit_ibm_runtime import EstimatorV2 as Estimator
from qiskit_ibm_catalog import QiskitFunctionsCatalog
from qiskit_aer import AerSimulator
from qiskit_addon_utils.slicing import combine_slices, slice_by_gate_types
from qiskit_addon_obp import backpropagate
from qiskit_addon_obp.utils.simplify import OperatorBudget
from qiskit_ibm_runtime import QiskitRuntimeService
from qiskit.visualization import (
    plot_gate_map,
)
Susunod, mag-authenticate gamit ang inyong API key mula sa IBM Quantum Platform dashboard. Pagkatapos, piliin ang Qiskit Function tulad ng sumusunod. (Tandaan na para sa seguridad, pinakamabuti na i-save ang inyong account credentials sa inyong local environment, kung kayo ay nasa pinagkakatiwalaang makina, upang hindi na kayo mag-enter ng inyong API key tuwing mag-authenticate.)
# Paste here your instance and token strings

instance = "YOUR_INSTANCE"
token = "YOUR_TOKEN"
channel = "ibm_quantum_platform"

catalog = QiskitFunctionsCatalog(
    channel=channel, token=token, instance=instance
)
qesem_function = catalog.load("qedma/qesem")
Hakbang 1: I-map ang classical inputs sa quantum problem
Magsisimula tayo sa pamamagitan ng pagtukoy ng function na lumilikha ng Trotter circuit:
def trotter_circuit_from_layers(
    steps: int,
    theta_x: float,
    theta_z: float,
    theta_zz: float,
    layers: Sequence[Sequence[tuple[int, int]]],
    init_state: str | None = None,
) -> qiskit.QuantumCircuit:
    """
    Generates an ising trotter circuit
    :param steps: trotter steps
    :param theta_x: RX angle
    :param theta_z: RZ angle
    :param theta_zz: RZZ angle
    :param layers: list of layers (can be list of layers in device)
    :param init_state: Initial state to prepare.
     If None, will not prepare any state. If "+", will
     add Hadamard gates to all qubits.
    :return: QuantumCircuit
    """
    qubits = sorted({i for layer in layers for edge in layer for i in edge})
    circ = qiskit.QuantumCircuit(max(qubits) + 1)

    if init_state == "+":
        print("init_state = +")
        for q in qubits:
            circ.h(q)

    for _ in range(steps):
        for q in qubits:
            circ.rx(theta_x, q)
            circ.rz(theta_z, q)

        for layer in layers:
            for edge in layer:
                circ.rzz(theta_zz, *edge)
        circ.barrier(qubits)

    return circ
Susunod ay lumilikha tayo ng function upang kalkulahin ang ideal expectation values gamit ang AerSimulator.
Tandaan na para sa malalaking circuits (30 o higit pang qubits) inirerekomenda namin ang paggamit ng precalculated values mula sa belief-propagation (BP) PEPS simulations. Ang code na ito ay naglalaman ng precalculated values para sa 35 qubits bilang halimbawa, batay sa BP approach para sa pag-evolve ng PEPS tensor network na ipinakilala sa paper na ito (na tinutukoy natin bilang PEPS-BP), gamit ang tensor-network Python package na quimb.
def calculate_ideal_evs(circ, obs, num_qubits, step):
    # Predefined results for large circuits - calculated using
    # bppeps for 3, 5, 7, 9 trotter steps
    predefined_35 = [
        0.79537,
        0.78653,
        0.79699,
    ]

    if num_qubits == 35:
        print(
            "Using precalculated ideal values for large circuits calculated "
            "with belief propagation PEPS. Currently only for 35 qubits."
        )
        return predefined_35[step]

    else:
        simulator = AerSimulator()

        # Use Estimator primitive to get expectation value
        estimator = Estimator(simulator)
        sim_result = estimator.run([(circ, [obs])], precision=0.0001).result()

        # Extracting the result
        ideal_values = sim_result[0].data.evs[0]
        return ideal_values
Ginagamit natin ang hardware-based na layer mapping na kinuha mula sa Heron device, kung saan pinutol natin ang mga layers ayon sa bilang ng qubits na nais nating i-simulate. Tinutukoy natin ang mga subgraphs para sa 10, 21, 28, at 35 qubits na nagpapanatili ng 2D structure (malayang baguhin sa inyong paboritong subgraph):
LAYERS_HERON_R2 = [  # the full set of hardware layers for Heron r2
    [
        (2, 3),
        (6, 7),
        (10, 11),
        (14, 15),
        (20, 21),
        (16, 23),
        (24, 25),
        (17, 27),
        (28, 29),
        (18, 31),
        (32, 33),
        (19, 35),
        (36, 41),
        (42, 43),
        (37, 45),
        (46, 47),
        (38, 49),
        (50, 51),
        (39, 53),
        (60, 61),
        (56, 63),
        (64, 65),
        (57, 67),
        (68, 69),
        (58, 71),
        (72, 73),
        (59, 75),
        (76, 81),
        (82, 83),
        (77, 85),
        (86, 87),
        (78, 89),
        (90, 91),
        (79, 93),
        (94, 95),
        (100, 101),
        (96, 103),
        (104, 105),
        (97, 107),
        (108, 109),
        (98, 111),
        (112, 113),
        (99, 115),
        (116, 121),
        (122, 123),
        (117, 125),
        (126, 127),
        (118, 129),
        (130, 131),
        (119, 133),
        (134, 135),
        (140, 141),
        (136, 143),
        (144, 145),
        (137, 147),
        (148, 149),
        (138, 151),
        (152, 153),
        (139, 155),
    ],
    [
        (1, 2),
        (3, 4),
        (5, 6),
        (7, 8),
        (9, 10),
        (11, 12),
        (13, 14),
        (21, 22),
        (23, 24),
        (25, 26),
        (27, 28),
        (29, 30),
        (31, 32),
        (33, 34),
        (40, 41),
        (43, 44),
        (45, 46),
        (47, 48),
        (49, 50),
        (51, 52),
        (53, 54),
        (55, 59),
        (61, 62),
        (63, 64),
        (65, 66),
        (67, 68),
        (69, 70),
        (71, 72),
        (73, 74),
        (80, 81),
        (83, 84),
        (85, 86),
        (87, 88),
        (89, 90),
        (91, 92),
        (93, 94),
        (95, 99),
        (101, 102),
        (103, 104),
        (105, 106),
        (107, 108),
        (109, 110),
        (111, 112),
        (113, 114),
        (120, 121),
        (123, 124),
        (125, 126),
        (127, 128),
        (129, 130),
        (131, 132),
        (133, 134),
        (135, 139),
        (141, 142),
        (143, 144),
        (145, 146),
        (147, 148),
        (149, 150),
        (151, 152),
        (153, 154),
    ],
    [
        (3, 16),
        (7, 17),
        (11, 18),
        (22, 23),
        (26, 27),
        (30, 31),
        (34, 35),
        (21, 36),
        (25, 37),
        (29, 38),
        (33, 39),
        (41, 42),
        (44, 45),
        (48, 49),
        (52, 53),
        (43, 56),
        (47, 57),
        (51, 58),
        (62, 63),
        (66, 67),
        (70, 71),
        (74, 75),
        (61, 76),
        (65, 77),
        (69, 78),
        (73, 79),
        (81, 82),
        (84, 85),
        (88, 89),
        (92, 93),
        (83, 96),
        (87, 97),
        (91, 98),
        (102, 103),
        (106, 107),
        (110, 111),
        (114, 115),
        (101, 116),
        (105, 117),
        (109, 118),
        (113, 119),
        (121, 122),
        (124, 125),
        (128, 129),
        (132, 133),
        (123, 136),
        (127, 137),
        (131, 138),
        (142, 143),
        (146, 147),
        (150, 151),
        (154, 155),
        (0, 1),
        (4, 5),
        (8, 9),
        (12, 13),
        (54, 55),
        (15, 19),
    ],
]

subgraphs = {  # the subgraphs for the different qubit counts such that it's 2D
    10: list(range(22, 29)) + [16, 17, 37],
    21: list(range(3, 12)) + list(range(23, 32)) + [16, 17, 18],
    28: list(range(3, 12))
    + list(range(23, 32))
    + list(range(45, 50))
    + [16, 17, 18, 37, 38],
    35: list(range(3, 12))
    + list(range(21, 32))
    + list(range(41, 50))
    + [16, 17, 18, 36, 37, 38],
    42: list(range(3, 12))
    + list(range(21, 32))
    + list(range(41, 50))
    + list(range(63, 68))
    + [16, 17, 18, 36, 37, 38, 56, 57],
}

n_qubits = 35  # 21, 28, 35, 42
layers = [
    [
        edge
        for edge in layer
        if edge[0] in subgraphs[n_qubits] and edge[1] in subgraphs[n_qubits]
    ]
    for layer in LAYERS_HERON_R2
]

print(layers)
[[(6, 7), (10, 11), (16, 23), (24, 25), (17, 27), (28, 29), (18, 31), (36, 41), (42, 43), (37, 45), (46, 47), (38, 49)], [(3, 4), (5, 6), (7, 8), (9, 10), (21, 22), (23, 24), (25, 26), (27, 28), (29, 30), (43, 44), (45, 46), (47, 48)], [(3, 16), (7, 17), (11, 18), (22, 23), (26, 27), (30, 31), (21, 36), (25, 37), (29, 38), (41, 42), (44, 45), (48, 49), (4, 5), (8, 9)]]
Ngayon ay i-visualize natin ang qubit layout sa Heron device para sa napiling subgraph:
service = QiskitRuntimeService(
    channel=channel,
    token=token,
    instance=instance,
)
backend = service.backend("ibm_fez")  # or any available device

selected_qubits = subgraphs[n_qubits]
num_qubits = backend.configuration().num_qubits
qubit_color = [
    "#ff7f0e" if i in selected_qubits else "#d3d3d3"
    for i in range(num_qubits)
]

plot_gate_map(
    backend=backend,
    figsize=(15, 10),
    qubit_color=qubit_color,
)
plt.show()
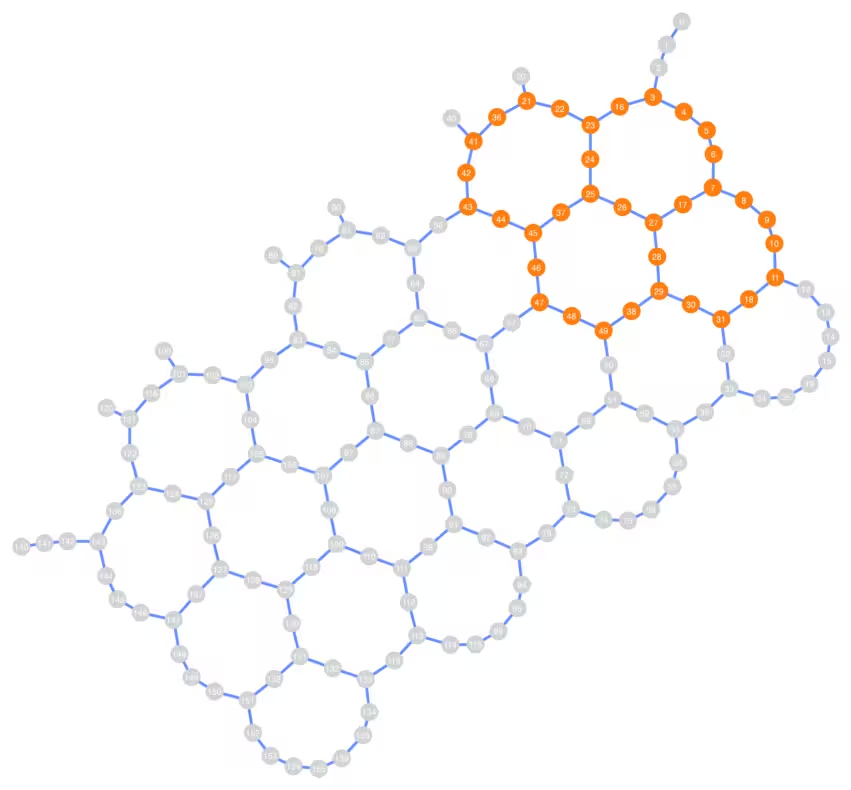
Pansinin na ang connectivity ng napiling qubit layout ay hindi kinakailangang linear, at maaaring sumasaklaw sa malalaking rehiyon ng Heron device depende sa napiling bilang ng qubits.
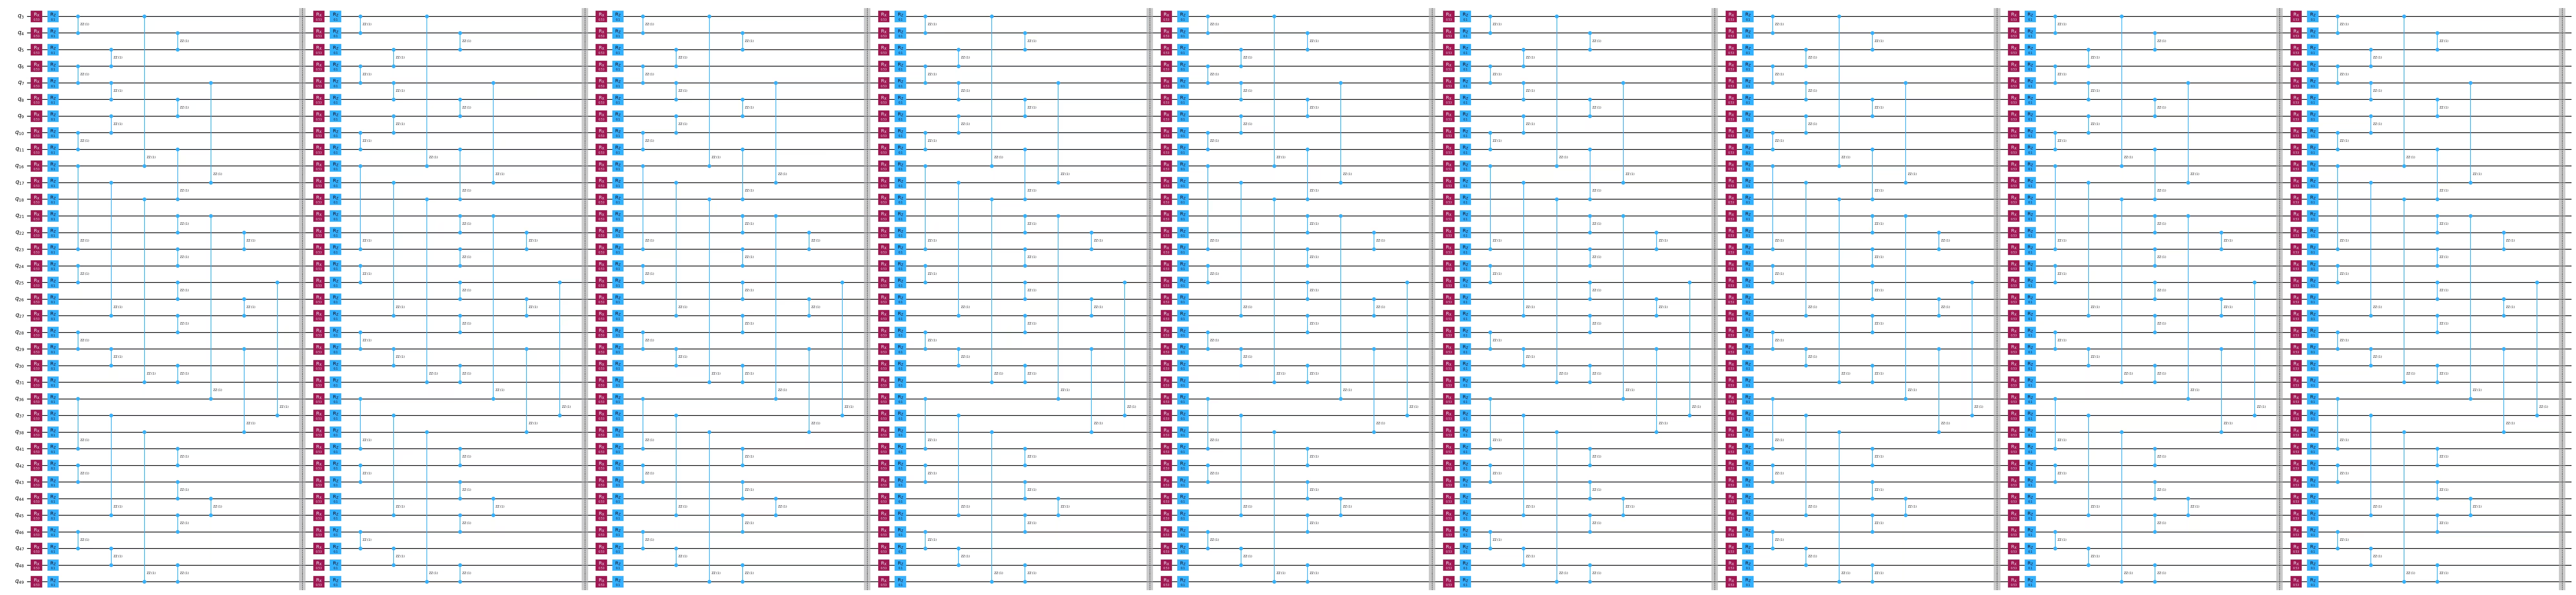
Ngayon ay bubuo tayo ng Trotter circuit at ng average magnetization observable para sa napiling bilang ng qubits at parameters:
# Chosen parameters:
theta_x = 0.53
theta_z = 0.1
theta_zz = 1.0
steps = 9

circ = trotter_circuit_from_layers(steps, theta_x, theta_z, theta_zz, layers)
print(
    f"Circuit 2q layers: "
    f"{circ.depth(filter_function=lambda instr: len(instr.qubits) == 2)}"
)
print("\nCircuit structure:")

circ.draw("mpl", scale=0.8, fold=-1, idle_wires=False)
plt.show()

observable = qiskit.quantum_info.SparsePauliOp.from_sparse_list(
    [("Z", [q], 1 / n_qubits) for q in subgraphs[n_qubits]],
    np.max(subgraphs[n_qubits]) + 1,
)  # Average magnetization observable

print(observable)
obs_list = [observable]
Circuit 2q layers: 27

Circuit structure:
SparsePauliOp(['IIIIIIIIIIIIIIIIIIIIIIIIIIIIIIIIIIIIIIIIIIIIIIZIII', 'IIIIIIIIIIIIIIIIIIIIIIIIIIIIIIIIIIIIIIIIIIIIIZIIII', 'IIIIIIIIIIIIIIIIIIIIIIIIIIIIIIIIIIIIIIIIIIIIZIIIII', 'IIIIIIIIIIIIIIIIIIIIIIIIIIIIIIIIIIIIIIIIIIIZIIIIII', 'IIIIIIIIIIIIIIIIIIIIIIIIIIIIIIIIIIIIIIIIIIZIIIIIII', 'IIIIIIIIIIIIIIIIIIIIIIIIIIIIIIIIIIIIIIIIIZIIIIIIII', 'IIIIIIIIIIIIIIIIIIIIIIIIIIIIIIIIIIIIIIIIZIIIIIIIII', 'IIIIIIIIIIIIIIIIIIIIIIIIIIIIIIIIIIIIIIIZIIIIIIIIII', 'IIIIIIIIIIIIIIIIIIIIIIIIIIIIIIIIIIIIIIZIIIIIIIIIII', 'IIIIIIIIIIIIIIIIIIIIIIIIIIIIZIIIIIIIIIIIIIIIIIIIII', 'IIIIIIIIIIIIIIIIIIIIIIIIIIIZIIIIIIIIIIIIIIIIIIIIII', 'IIIIIIIIIIIIIIIIIIIIIIIIIIZIIIIIIIIIIIIIIIIIIIIIII', 'IIIIIIIIIIIIIIIIIIIIIIIIIZIIIIIIIIIIIIIIIIIIIIIIII', 'IIIIIIIIIIIIIIIIIIIIIIIIZIIIIIIIIIIIIIIIIIIIIIIIII', 'IIIIIIIIIIIIIIIIIIIIIIIZIIIIIIIIIIIIIIIIIIIIIIIIII', 'IIIIIIIIIIIIIIIIIIIIIIZIIIIIIIIIIIIIIIIIIIIIIIIIII', 'IIIIIIIIIIIIIIIIIIIIIZIIIIIIIIIIIIIIIIIIIIIIIIIIII', 'IIIIIIIIIIIIIIIIIIIIZIIIIIIIIIIIIIIIIIIIIIIIIIIIII', 'IIIIIIIIIIIIIIIIIIIZIIIIIIIIIIIIIIIIIIIIIIIIIIIIII', 'IIIIIIIIIIIIIIIIIIZIIIIIIIIIIIIIIIIIIIIIIIIIIIIIII', 'IIIIIIIIZIIIIIIIIIIIIIIIIIIIIIIIIIIIIIIIIIIIIIIIII', 'IIIIIIIZIIIIIIIIIIIIIIIIIIIIIIIIIIIIIIIIIIIIIIIIII', 'IIIIIIZIIIIIIIIIIIIIIIIIIIIIIIIIIIIIIIIIIIIIIIIIII', 'IIIIIZIIIIIIIIIIIIIIIIIIIIIIIIIIIIIIIIIIIIIIIIIIII', 'IIIIZIIIIIIIIIIIIIIIIIIIIIIIIIIIIIIIIIIIIIIIIIIIII', 'IIIZIIIIIIIIIIIIIIIIIIIIIIIIIIIIIIIIIIIIIIIIIIIIII', 'IIZIIIIIIIIIIIIIIIIIIIIIIIIIIIIIIIIIIIIIIIIIIIIIII', 'IZIIIIIIIIIIIIIIIIIIIIIIIIIIIIIIIIIIIIIIIIIIIIIIII', 'ZIIIIIIIIIIIIIIIIIIIIIIIIIIIIIIIIIIIIIIIIIIIIIIIII', 'IIIIIIIIIIIIIIIIIIIIIIIIIIIIIIIIIZIIIIIIIIIIIIIIII', 'IIIIIIIIIIIIIIIIIIIIIIIIIIIIIIIIZIIIIIIIIIIIIIIIII', 'IIIIIIIIIIIIIIIIIIIIIIIIIIIIIIIZIIIIIIIIIIIIIIIIII', 'IIIIIIIIIIIIIZIIIIIIIIIIIIIIIIIIIIIIIIIIIIIIIIIIII', 'IIIIIIIIIIIIZIIIIIIIIIIIIIIIIIIIIIIIIIIIIIIIIIIIII', 'IIIIIIIIIIIZIIIIIIIIIIIIIIIIIIIIIIIIIIIIIIIIIIIIII'],
              coeffs=[0.02857143+0.j, 0.02857143+0.j, 0.02857143+0.j, 0.02857143+0.j,
 0.02857143+0.j, 0.02857143+0.j, 0.02857143+0.j, 0.02857143+0.j,
 0.02857143+0.j, 0.02857143+0.j, 0.02857143+0.j, 0.02857143+0.j,
 0.02857143+0.j, 0.02857143+0.j, 0.02857143+0.j, 0.02857143+0.j,
 0.02857143+0.j, 0.02857143+0.j, 0.02857143+0.j, 0.02857143+0.j,
 0.02857143+0.j, 0.02857143+0.j, 0.02857143+0.j, 0.02857143+0.j,
 0.02857143+0.j, 0.02857143+0.j, 0.02857143+0.j, 0.02857143+0.j,
 0.02857143+0.j, 0.02857143+0.j, 0.02857143+0.j, 0.02857143+0.j,
 0.02857143+0.j, 0.02857143+0.j, 0.02857143+0.j])
Hakbang 2: I-optimize ang problema para sa quantum hardware execution
Estimate ng QPU time na may at walang OBP
Karaniwang nais ng mga users na malaman kung gaano karaming QPU time ang kailangan para sa kanilang eksperimento. Gayunpaman, ito ay itinuturing na mahirap na problema para sa classical computers.
Nag-aalok ang QESEM ng dalawang modes ng time estimation upang ipaalam sa mga users ang feasibility ng kanilang mga eksperimento:
- Analytical time estimation - nagbibigay ng napakagaspang na estimate at hindi nangangailangan ng QPU time. Maaari itong gamitin upang masubukan kung ang isang transpilation pass ay posibleng magbawas ng QPU time.
- Empirical time estimation (ipinakita dito) - nagbibigay ng napakahusay na estimate at gumagamit ng ilang minuto ng QPU time.
Sa parehong kaso, ang QESEM ay naglalabas ng time estimation para sa pag-abot ng kinakailangang precision para sa lahat ng observables.
run_on_real_hardware = True

precision = 0.05
if run_on_real_hardware:
    backend_name = "ibm_fez"
else:
    backend_name = "fake_fez"

# Start a job for empirical time estimation
estimation_job_wo_obp = qesem_function.run(
    pubs=[(circ, obs_list)],
    instance=instance,
    backend_name=backend_name,  # E.g. "ibm_brisbane"
    options={
        # "empirical" - gets actual time estimates without running full mitigation
        "estimate_time_only": "empirical",
        "max_execution_time": 120,  # Limits the QPU time, specified in seconds.
        "default_precision": precision,
    },
)
print(estimation_job_wo_obp.job_id)
print(estimation_job_wo_obp.status())
17d3828e-9fdb-482e-8e9b-392f3eefe313
DONE
# Get the result object (blocking method).
# Use job.status() in a loop for non-blocking.
# This takes 1-3 minutes
result = estimation_job_wo_obp.result()
print(
    f"Empirical time estimation (sec): {result[0].metadata['time_estimation_sec']}"
)
Empirical time estimation (sec): 1200
Ngayon ay gagamitin natin ang operator backpropagation (OBP). (Tingnan ang OBP guide para sa higit pang detalye sa OBP Qiskit addon.) Lumilikha tayo ng function na bumubuo ng circuit slices para sa backpropagation:
def run_backpropagation(circ_vec, observable, steps_vec, max_qwc_groups=8):
    """
    Runs backpropagation for a list of circuits and observables.
    Returns lists of backpropagated circuits and observables.
    """
    op_budget = OperatorBudget(max_qwc_groups=max_qwc_groups)
    bp_circuit_vec = []
    bp_observable_vec = []

    for i, circ in enumerate(circ_vec):
        slices = slice_by_gate_types(circ)
        bp_observable, remaining_slices, metadata = backpropagate(
            observable,
            slices,
            operator_budget=op_budget,
        )
        bp_circuit = combine_slices(remaining_slices, include_barriers=True)
        bp_circuit_vec.append(bp_circuit)
        bp_observable_vec.append(bp_observable)
        print(f"n.o. steps: {steps_vec[i]}")
        print(f"Backpropagated {metadata.num_backpropagated_slices} slices.")
        print(
            f"New observable has {len(bp_observable.paulis)} terms, "
            f"which can be combined into "
            f"{len(bp_observable.group_commuting(qubit_wise=True))} groups.\n"
            f"After truncation, the error in our observable is bounded by "
            f"{metadata.accumulated_error(0):.3e}"
        )
        print("-----------------")
    return bp_circuit_vec, bp_observable_vec
Tatawagan natin ang function:
bp_circ_vec, bp_obs_vec = run_backpropagation([circ], observable, [steps])
n.o. steps: 9
Backpropagated 11 slices.
New observable has 363 terms, which can be combined into 4 groups.
After truncation, the error in our observable is bounded by 0.000e+00
-----------------
print("The remaining circuit after backpropagation looks as follows:")
bp_circ_vec[-1].draw("mpl", scale=0.8, fold=-1, idle_wires=False)
None
The remaining circuit after backpropagation looks as follows:

Makikita natin na ang backpropagation ay nagbawas ng dalawang layers ng circuit. Ngayong mayroon na tayong reduced circuit at expanded observables, gumawa tayo ng time estimation sa backpropagated circuit:
# Start a job for empirical time estimation
estimation_job_obp = qesem_function.run(
    pubs=[(bp_circ_vec[-1], [bp_obs_vec[-1]])],
    instance=instance,
    backend_name=backend_name,
    options={
        "estimate_time_only": "empirical",
        "max_execution_time": 120,
        "default_precision": precision,
    },
)
print(estimation_job_obp.job_id)
print(estimation_job_obp.status())
8bae699d-a16b-4d39-bbd9-d123fbcce55d
DONE
result_obp = estimation_job_obp.result()
print(
    f"Empirical time estimation (sec): {result_obp[0].metadata['time_estimation_sec']}"
)
Empirical time estimation (sec): 900
Nakikita natin na ang OBP ay nagbabawas ng time cost para sa mitigation ng circuit.
Hakbang 3: Isagawa gamit ang Qiskit primitives
Patakbuhin gamit ang tunay na backend
Ngayon ay ipapatakbo natin ang buong eksperimento sa ilang Trotter steps. Ang bilang ng qubits, kinakailangang precision, at maximum QPU time ay maaaring baguhin ayon sa available na QPU resources. Tandaan na ang pagpigil sa maximum QPU time ay makakaapekto sa final precision, tulad ng makikita ninyo sa final plot sa ibaba.
Sinusuri natin ang apat na circuits na may 5, 7, at 9 Trotter steps sa precision na 0.05, na inihahambing ang kanilang ideal, noisy, at error-mitigated expectation values:
steps_vec = [5, 7, 9]

circ_vec = []
for steps in steps_vec:
    circ = trotter_circuit_from_layers(
        steps, theta_x, theta_z, theta_zz, layers
    )
    circ_vec.append(circ)
Muli, isasagawa natin ang OBP sa bawat circuit upang bawasan ang runtime:
bp_circ_vec_35, bp_obs_vec_35 = run_backpropagation(
    circ_vec, observable, steps_vec
)
n.o. steps: 5
Backpropagated 11 slices.
New observable has 363 terms, which can be combined into 4 groups.
After truncation, the error in our observable is bounded by 0.000e+00
-----------------
n.o. steps: 7
Backpropagated 11 slices.
New observable has 363 terms, which can be combined into 4 groups.
After truncation, the error in our observable is bounded by 0.000e+00
-----------------
n.o. steps: 9
Backpropagated 11 slices.
New observable has 363 terms, which can be combined into 4 groups.
After truncation, the error in our observable is bounded by 0.000e+00
-----------------
Ngayon ay magpapatakbo tayo ng batch ng buong QESEM jobs. Limitahan natin ang maximum QPU runtime para sa bawat punto para sa mas mahusay na kontrol sa QPU budget.
run_on_real_hardware = True

precision = 0.05
if run_on_real_hardware:
    backend_name = "ibm_marrakesh"
else:
    backend_name = "fake_fez"
# Running full jobs for:
pubs_list = [
    [(bp_circ_vec_35[i], bp_obs_vec_35[i])] for i in range(len(bp_obs_vec_35))
]
# Initiating multiple jobs for different lengths
job_list = []
for pubs in pubs_list:
    job_obp = qesem_function.run(
        pubs=pubs,
        instance=instance,
        backend_name=backend_name,  # E.g. "ibm_brisbane"
        options={
            "max_execution_time": 300,  # Limits the QPU time, specified in seconds.
            "default_precision": 0.05,
        },
    )
    job_list.append(job_obp)
Dito ay susuriin natin ang status ng bawat job:
for job in job_list:
    print(job.status())
DONE
DONE
DONE
DONE
Hakbang 4: Post-process at ibalik ang resulta sa nais na classical format
Kapag natapos na ang lahat ng jobs sa pagpapatakbo, maaari nating ihambing ang kanilang noisy at mitigated expectation value.
ideal_values = []
noisy_values = []
error_mitigated_values = []
error_mitigated_stds = []

for i in range(len(job_list)):
    job = job_list[i]
    result = job.result()  # Blocking - takes 3-5 minutes
    noisy_results = result[0].metadata["noisy_results"]

    ideal_val = calculate_ideal_evs(circ_vec[i], observable, n_qubits, i)
    print("---------------------------------")
    print(f"Ideal: {ideal_val}")
    print(f"Noisy: {noisy_results.evs}")
    print(f"QESEM: {result[0].data.evs} \u00b1 {result[0].data.stds}")

    ideal_values.append(ideal_val)
    noisy_values.append(noisy_results.evs)
    error_mitigated_values.append(result[0].data.evs)
    error_mitigated_stds.append(result[0].data.stds)
Using precalculated ideal values for large circuits calculated with belief propagation PEPS. Currently only for 35 qubits.
---------------------------------
Ideal: 0.79537
Noisy: 0.7039237951821501
QESEM: 0.7828018244130982 ± 0.013257266977728376
Using precalculated ideal values for large circuits calculated with belief propagation PEPS. Currently only for 35 qubits.
---------------------------------
Ideal: 0.78653
Noisy: 0.6478583812958806
QESEM: 0.7875259197423828 ± 0.02703045139248604
Using precalculated ideal values for large circuits calculated with belief propagation PEPS. Currently only for 35 qubits.
---------------------------------
Ideal: 0.79699
Noisy: 0.6171787879868142
QESEM: 0.6918791909168913 ± 0.0740873782039517
Sa wakas, maaari nating i-plot ang magnetization versus ang bilang ng steps. Ito ay nagbubuod ng benepisyo ng paggamit ng QESEM Qiskit Function para sa bias-free error mitigation sa maingay na quantum devices.
plt.plot(steps_vec, ideal_values, "--", label="ideal")
plt.scatter(steps_vec, noisy_values, label="noisy")
plt.errorbar(
    steps_vec,
    error_mitigated_values,
    yerr=error_mitigated_stds,
    fmt="o",
    capsize=5,
    label="QESEM mitigation",
)
plt.legend()
plt.xlabel("n.o. steps")
plt.ylabel("Magnetization")
Text(0, 0.5, 'Magnetization')

Ang ikasiyam na hakbang ay may malaking statistical error bar dahil nilimitahan natin ang QPU time sa 5 minuto. Kung ipapatakbo ninyo ang hakbang na ito nang 15 minuto (tulad ng iminumungkahi ng empirical time estimation), makakakuha kayo ng mas maliit na error bar. Kaya, ang mitigated value ay magiging mas malapit sa ideal value.